Posted on

Reflections

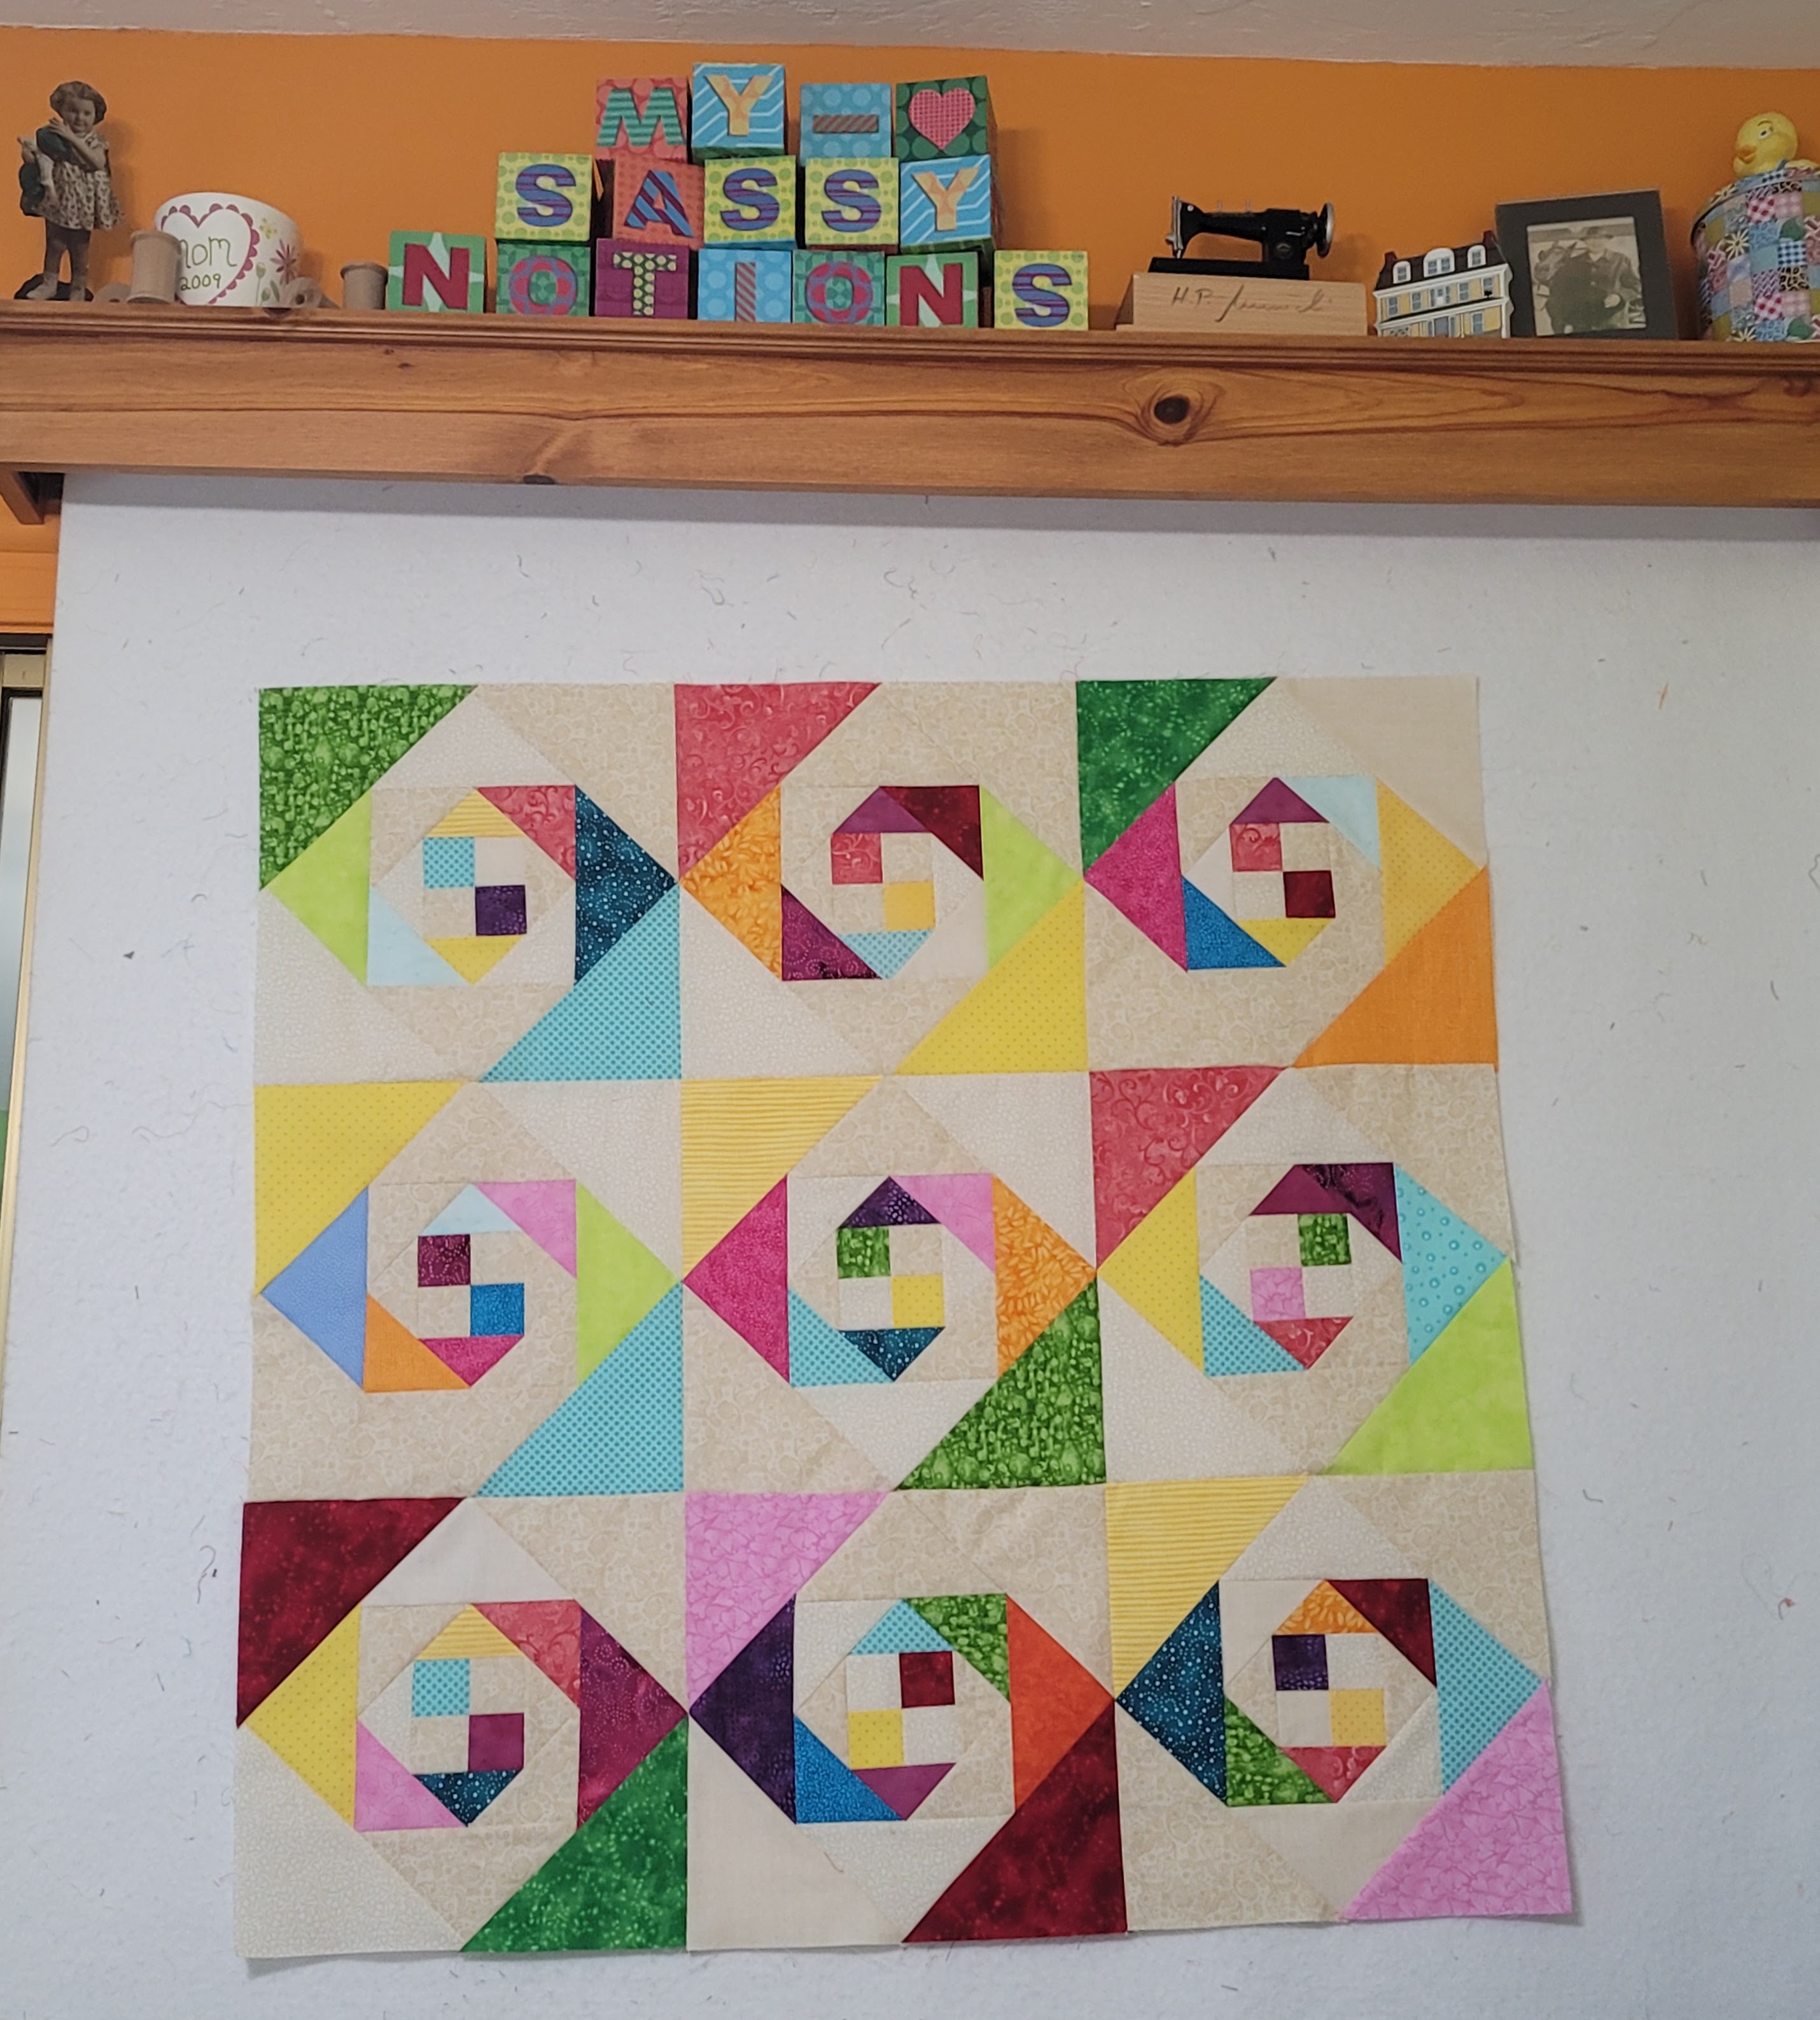
The journey for Reflections started last fall when I ran into Terry Gallegos from Quilt for a Cause at a sewing expo. Long story short: I took on the task of creating a quilt pattern that would be sold and a percentage of the profits would go to Quilt for a Cause. My goal was to create a quilt with somewhat of a wow factor, could be made by a confident beginner, but also one where the pattern wasn’t easily seen at first sight. The reaction so far has been good.

This journey was a personal one; having lost a close friend to Breast Cancer and being a survivor myself, I wanted to both honor my friend and put my personal stamp on it. I played around with triangle placement for a few weeks and eventually settled on a design. Next up: Fabric.

My intention was to mix up a variety of colors, but in the end, Pink won out. I used fabrics from Tula Pink, Alice Glass, Kaffe Fassett and others.  The print fabrics all read the same and, in the end, that was the right choice.

The quilting on the sample was done by Two Hearts Quilting and finished by Terry Gallegos and Mimi Pollow; all of Tucson, AZ.

Back to Quilt for a Cause. I encourage you to go to their website and read about the various ways they fight breast and gynecological cancers. This is truly a special organization and I’m proud to have added another pattern to their lineup.

If you have any questions about the quilt or the pattern, feel free to reach out.

Thank you to those who purchase the pattern; it really means a lot to me.

~Pam Varner

Click here to purchase.

Posted on 3 Comments

Happy New Year

Intentions for the New Year

It is already a week into 2022 and my best intention of writing a New Year’s post is a tad late. I could have just scraped the idea, but I want to get this year off to a good start.

Resolutions always seemed so negative to me. “I won’t buy anymore fabric until I use up what I have.” Or “I won’t start any projects until I finish my UFOs.”

I do have goals and intentions. For 2022, my goal is to produce more content. What does that look like? Well, I intend to write more blog posts, increase my social media presence, and provide more educational materials.

I’ve got a few ideas; one will be making a small quilt starting from picking the right fabric to putting on the binding.

What would you like to learn this year? Perhaps it’s applique, or paper piecing. Or ideas on using all those decorative stitches on your machine. Let me know; maybe your intentions will become my content.

Wishing everyone a Happy and Healthy 2022.

~Pam

Posted on

Lucky Lola

Snails Trail Accuquilt

I’ve wanted to make a scrappy Snail’s Trail quilt for some time now. Over the weekend I decided to start and promptly got all my scraps out of hiding and went to work. Originally, I wanted to use white on white as the background, but I don’t have enough white on white. It took forever to cut (even with my Accuquilt Go!) as my scraps are more suited for applique than block pieces. When I had enough cut for eight blocks I started to sew. Almost completed, I went to get a project box for them as my calculations are telling me I will need 64 blocks. I like to store my ongoing quilts in project boxes; it just makes it easier to keep everything together. When I looked on the shelf, I noticed I had a project box that was labeled Snail’s Trail. It seems many years ago when I came up with this idea, I started collecting fabric for it including the white on white. I had eight (now practice) blocks almost completed that did not go with my newly found fabrics. My choices were 24” by 36” or 24” by 24” OR…..make another block and end up with 36” by 36.” BINGO! Is there a song like Bingo but for a cat?

A cat? Yes, because this is the perfect size for my cat, Lola. You see, Lola loves quilts. She chooses them over area rugs, blankets, sun filled windows, etc. I have a quilted piece that I was testing tension and designs on so I put it on the floor in my studio to see what she would do. Yep, worked like a cat magnet.

I texted my daughter the picture of the pieced quilt and her response was, “Lucky Lola.” Perfect quilt name. Now to find the backing fabric and the time to do the quilting.

Lola on her current favorite, aka as Lola’s Quilt
Posted on

Organic Marking Tools

Let’s face it, not everyone likes working with chemicals of any kind. Some have sensitivities or allergies to contend with. I consider my self fortunate that I don’t fall in that category. Some just prefer not to use pens, pencils, crayons, etc on their fabric. I have some solutions for that.


Ground Cinnamon

A plus here is the smell. Fill your sewing space with the scent of cinnamon and you may never need your kitchen again. Will brush or wash off. In my previous post, I talked about Ultimate Pounce Powder. You can add a pinch of cinnamon to that powder on very light fabrics.

Old Fashioned Bar Soap

Make sure that it is plain, unscented and is free from oils. You can cut off slivers to use for marking. The soap easily washes away. I have had soap get on my iron; if that happens, wait until your iron has cooled off and simply wipe away with a damp rag.

Last for today is a Hera Marker. The edge of it is sharp (not like a knife so you won’t hurt yourself) . It leaves an indent in your fabric. This will not show up if you mark your fabric on a hard surface, so it’s not the best choice for some applications. When marking a quilt sandwich, the batting gives the squish you need so the lines show up. When marking pieces of just fabric, I use my ironing surface or lay on top of a piece of batting.

My eyes are not the best, so I sometimes struggle to see a Hera Marker line. I have found if I turn down, off, or cover my sewing machine light that I have better visibility. (My lights are LED, if yours are not, I strongly discourage you from doing this as it could be a fire hazard.)

That concludes my organic choices. Have you tried any of these options? What were your experiences? If I haven’t touched on a something that interests you, don’t worry, there’s a few more techniques yet to be explored.

Posted on

Win a Free Lesson

I love learning! It’s time to share that love by offering one lucky quilter a Free Private Lesson. This will be done via Zoom from my studio. Time and Date to be worked out between me and the winner. How do you enter? Simple. Just comment on this post on what you would like to learn. I will select a winner sometime on September 1, 2020.

**You will need to enter your email address to comment, but it is not made public. Commenting will not add you to my email list.

Congrats to the winners I decided to pick 2.
Posted on

My Favorite Marking Tools

Today I am going to talk about a few different marking tools. These are my personal favorites and are listed in order of preference. I will explore more in future posts, so stay tuned.

Let us start with my go-to marking tool. I empty a Chaco Pen Style liner and fill it with Ultimate Pounce Powder. Both must be white. I use a can of air to make sure all the Chaco powder is removed; careful as the end cap can fly across the room and yes, I am speaking from experience. This liner fits perfectly in the Westalee Design Crosshair Squares. The Ultimate Pounce Powder will brush, wash, or iron off. Pounce Powder comes in different types and colors so be sure it’s the Iron Off Ultimate; again, only in white. I think I have 3 of these in various locations in my studio. If it shows up on my fabric, this is what I use. I always have one next to my machine for those times I mark on the go.

Styla
Eraser

Next up, Sewline’s Products for when white doesn’t show up.
I like this Sewline Styla Ceramic Roller Ball Water Erasable Pen because it’s a fine line and fainter than most water-soluble pens. Their Liquid Eraser is a great way to remove the lines without having to wash the entire project. It works just like a pencil eraser.
It is a liquid with a ratio of 5 drops to 4 Tbl. so, it lasts a long time.
I’ve seen other similar erasers and the nibs (soft end that soaks in the liquid) fall apart. I’ve been using the same one for a year. They are replaceable.

Finally, Frixion Markers. Yes, I have read and heard all the horror stories. No, these are not formulated for use with fabric. I get it, some people really don’t like these and adamantly discourage everyone from using them. Here’s the thing, I don’t normally make heirloom quilts. I make utilitarian ones AND I have never (knocking on wood) had a mark come back. On those occasions where I don’t want to take even the slightest chance, I don’t. Now for a few tips.

A few tips for using these.

  1. Use the color markers, not the pens with metal tips. These have felt tips and will not scratch your fabric, which is my unproven reason why marks appear.
  2. Treat your fabric prior to marking with a starch. I’ve tried a few brands. Again, unsubstantiated, but I believe it puts a barrier between the marker and the fabric.
  3. This isn’t a strength contest, use a super light hand. The mark only needs to show up enough for you to see it.
  4. A fine line marker was recently released. Not a fan. The tip on the one I tried started falling apart after a few weeks.

Well, those are the first 3 on my list. Over the coming weeks, I will share some more.

Few last thoughts: I often remind my students that all the information we find in the world is most likely based on an individual’s experiences. I have done my own tests, but I don’t run a lab. Run your own experiments, EVERY SINGLE TIME! I cannot stress this enough. And test all the variables. Farbric: was it prewashed? did you starch it? Batting; I had it absorb a marking pen once, this did not end well. Thread: Had a student suffer a mishap when the cotton thread she used would not release a wash away marker. Read the directions. Did you know that some water-soluble inks need to be rinsed in clear water? Translation: Do not use detergent to remove marks. Rinse, then wash with detergent if desired.

Sew that’s it for now. If there is a product you want to know more about, let me know. If I have experience, I’ll share. If I have the product and haven’t used it yet, I will run a test and let you know what I find out. Are you curious to see what’s next on my list?

Posted on

Happy Birthday, Eleanor Burns!

Eleanor Burns’ PBS series is literally the reason I got into quilting. She is by far the best teacher for anyone learning to quilt. I agree there are a lot of great videos available today, but Eleanor’s step by steps demos will hone anyone’s skills. Whether it is ¼” seams, pressing, nesting, or picking up a great tip or two or a hundred, you cannot go wrong watching any Quilt In A Day video. I learned about strip piecing, trimming, and the ever-useful twirling seams from Eleanor. I learned my favorite method of applique from her and it is still the method I teach the most.

I was fortunate enough to attend one of Quilt in A Day’s teacher training events. Learning from her and spending time in her studio was magical and I came home with a wealth of knowledge and tips that I added to my teaching toolbox. I will tell you that the Eleanor you see on YouTube (the modern version of PBS instructional shows) is the Eleanor I met. She is kind and generous with her time and her talents.

I see so many new quilters get frustrated because they don’t know how to check for a ¼’ seam or the proper way to press or fill in the blank. I encourage you to watch her videos, especially the older ones,  to learn the “right” way to piece. Yes, I am saying I think Eleanor’s way is the right way. Once you have the piecing skills, venture off to a myriad of quilting demos and fill your up your toolbox with endless piecing options.

We do have our differences; Eleanor prefers to do the quilting process by credit card, I prefer using a ruler foot and templates. The great part? Differences make us who we are and I wouldn’t have it any other way.

Grab yourself a beverage and click on over to YouTube. I am confident you’ll become a fan too.

Posted on

Westalee Snowflakes; Tips and Tricks

Thinking about snow in October? Some places have already had their first flurries, but I suspect it will be a while before we see any in the Desert Southwest.

Thinking about snow in October? Some places have already had their first flurries, but I suspect it will be a while before we see any in the Desert Southwest. That doesn’t mean we shouldn’t be making them out of foam board, pom poms, pipe cleaners, paper & glue, or any other items you can think of.  I’ll be sticking to fabric, batting, and Westalee Templates this season.

Like the other templates in the Spin-E-Fex collection, the Snowflake templates have reference lines that work with the 8 point Crosshair Square. I want my snowflakes to have 6 points. Oh, and I don’t want to mark my fabric. Then it occurred to me. I don’t have to if I spend a little time preparing my templates. In the following video, I show you how to mark your templates instead of your fabric, how to stitch out the snowflakes and stick around to the end for how to clean your templates.

These are the products I used.

Mini Cross Hair Squares

Snowflake Templates

Grid Glider